Skill: Electrical Gate Encoders and Limit Switches
Skill level: 3
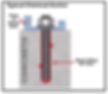
Wiring
Learning Objective
Learn to identify, configure, and test different types of encoders and limit switches used in gate automation systems — understanding how they stop gates, inform control boards, or override torque sensing to ensure safe and reliable operation.
1. Overview
Encoders and limit switches are essential safety and control devices in gate automation.
They:
Tell the control board where the gate is (open/closed/in-between)
Physically stop current flow in some designs
Override or supplement torque sensing to protect people and motors
Ensure reliable stopping without relying purely on time or power draw
Different systems use different technologies, from simple microswitches to advanced encoders with constant position feedback.
2. Tools & Materials Required
Multimeter (for continuity testing)
Small screwdrivers / Allen keys (for cam or switch adjustment)
Test monitor / control board access (to check feedback LEDs or software status)
Magnet (for testing reed switches)
Laptop or programming device (for systems with encoder learning cycles)
PPE: gloves, safety glasses
3. Before You Start
Identify the type of encoder or switch used on the system (micro, reed, cam, hall effect, optical, etc.)
Check whether the device directly cuts motor current or simply signals the board
Place the gate in manual or dead man mode to prevent sudden unexpected movement
Make sure hinges, posts, and stops are set correctly before fine-tuning electronics
4. Procedure (Main Process)
A. Micro or Cam Limit Switches (common on rams/underground motors)
Locate the open/close cams inside the motor casing.
Move gate to exact desired open/close point.
Adjust cam so it just activates switch at that position.
Tighten fixings securely — loose cams cause drift.
Run gate several cycles and confirm repeatable stopping.
B. Reed Switches
Mount magnet on moving part (gate leaf or rack).
Fix reed switch on static frame so it triggers reliably.
Use multimeter to check switch makes/breaks cleanly.
Confirm polarity/logic match the control board.
Test in live operation for repeatability.
C. Hall Effect Sensors (usually built in)
Enter control board’s learn mode.
Run gates open/closed fully several times.
Control board stores travel data from sensor feedback.
Confirm gates now stop and slow smoothly.
D. Optical/Magnetic Encoders (shaft-based)
Typically non-adjustable — mounted internally.
Initiate learning run on control board.
Verify board detects position correctly in menus or LEDs.
5. Best Practices
Always leave a small margin before physical end stops (don’t let limits press tight)
Label limit switch/encoder wires clearly in control box
Record encoder/limit setup in job notes for future servicing
Use a test meter rather than “guessing” switch positions
After adjustments, always run multiple full cycles to confirm stability
6. Common Mistakes to Avoid
🚫 Loose cams or adjustment screws — leads to inconsistent stops
🚫 Misaligned reed switches or magnets that vibrate loose
🚫 Forgetting to run a learning cycle after replacing a control board
🚫 Assuming all switches cut motor power — some only signal logic
🚫 Testing live without PPE or safe mode enabled
7. Safety Information
This task must be carried out in accordance with SSOW-005: Electrical Limits, Encoders, and Position Sensors.
Always use dead man mode for first testing.
Keep fingers and tools clear of hinges and moving arms.
Never bypass or disable encoder/limit devices.